How to Monitor App Uninstalls on Android Devices Accurately?
Tracking an app uninstall event is crucial for understanding user behaviour and improving your mobile marketing strategy. When a user removes your app, it reveals valuable insights about engagement, retention, and campaign performance.
In this guide, you’ll learn how to enable app uninstall tracking for Android using Firebase and integrate it with Trackier Apptrove.
The process is simple and involves three key steps:
- Setting up a common identifier in your Android application
- Enabling the uninstall conversion event in Firebase
- Creating a Firebase Cloud Function to send uninstall data to Apptrove
Let’s walk through each step in detail.
Step 1: Set Up a Common Identifier
The first step in enabling app uninstall tracking is setting up a common identifier inside your Android application. This identifier helps link user data with the uninstall event captured through Firebase.
To do this, you need to add Firebase Analytics to your Android app and set user properties.
Initialize Firebase Analytics
Add the following code in your application to initialize Firebase Analytics and create the required identifier.
private FirebaseAnalytics firebaseAnalytics;
firebaseAnalytics = FirebaseAnalytics.getInstance(this);
firebaseAnalytics.setUserProperty(
“ct_objectId”,
Objects.requireNonNull(TrackierSDK.getTrackierId())
);
This code retrieves the Trackier install ID and stores it as a user property called ct_objectId. This property acts as the primary identifier used later when sending uninstall data.
Optional Fields You Can Track
In addition to the main identifier, you can track extra information related to the app uninstall event. These fields are optional but useful for better user attribution and segmentation.
Application Mode
firebaseAnalytics.setUserProperty(
“ct_mode”,
Objects.requireNonNull(“”)
);
This property allows you to store the application mode, which may represent environments such as production or testing.
Customer User ID
firebaseAnalytics.setUserProperty(
“ct_uid”,
Objects.requireNonNull(“”)
);
You can store your internal customer user ID using this property.
Customer Email
firebaseAnalytics.setUserProperty(
“ct_mail”,
Objects.requireNonNull(“”)
);
This field stores the customer’s email address if available.
These optional fields can help you analyze patterns behind every app uninstall event and understand which user segments are leaving your application.
Step 2: Enable the App Remove Conversion Event in Firebase
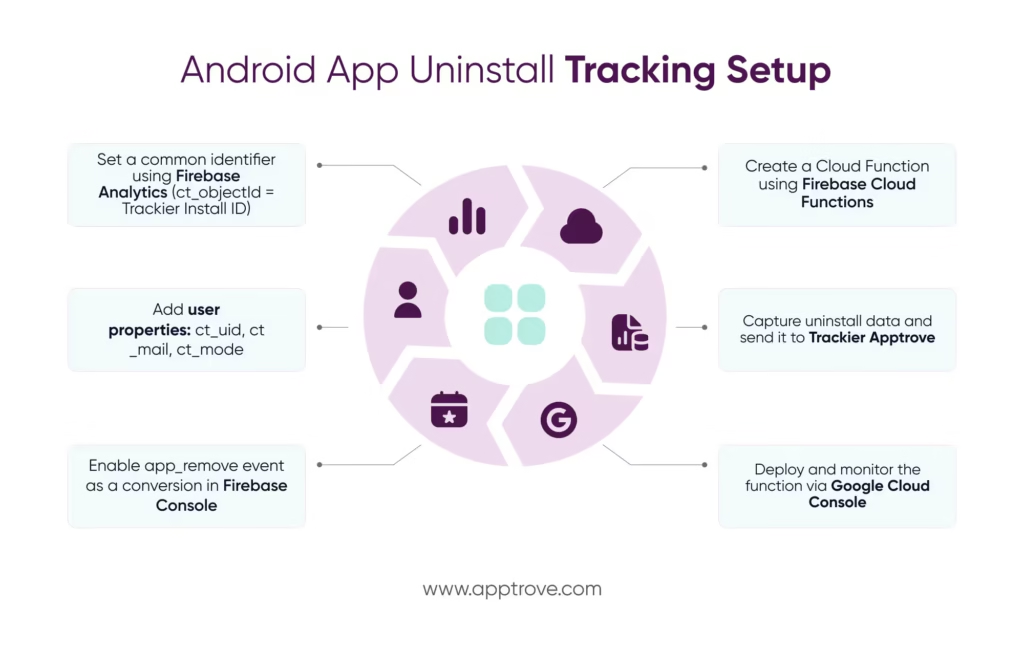
Firebase Analytics automatically collects the app_remove event whenever a user removes an Android application from their device. However, to use this event for uninstall tracking, you need to mark it as a conversion.
This step ensures the app uninstall event can trigger your cloud function and send the required data to Trackier Apptrove.
Steps to Enable the Event
Follow these steps in the Firebase Console:
- Open the Firebase Console.
- Select the Firebase project connected to your Android application.
- Navigate to Analytics → Events in the dashboard.
- Locate the app_remove event in the event list.
- Enable the Mark as conversion toggle.
Once enabled, Firebase will treat the app_remove event as a conversion event. This allows the uninstall data to be captured and processed for app uninstall tracking.
Keep in mind that the app_remove event is available only for Android applications and is triggered when a user removes the app from their device.
Step 3: Create a Cloud Function to Send App Uninstall Data
After enabling the conversion event, the next step is to create a Firebase Cloud Function that sends the app uninstall data to Trackier Apptrove.
This function listens for the app_remove event and forwards the data to Trackier’s uninstall endpoint.
Pre-Requisites
Before creating the cloud function, make sure your environment is properly configured.
Install Node.js
Your system must have Node.js installed. Version 18 or higher is recommended.
To verify the installed version, run:
node -v
If Node.js is not installed, download it from:
Google Cloud Permissions
Ensure that your user account in the Google Cloud project has permission to create cloud functions.
You can verify this here:
https://console.cloud.google.com/functions/list
Setting Up Firebase Cloud Functions
Follow the steps below to create and deploy the function.
1. Install Firebase CLI
Open a terminal and install the Firebase command-line tool.
npm install -g firebase-tools
2. Log in to Firebase
Authenticate your Firebase account.
firebase login
3. Initialize Firebase Functions
Navigate to your Firebase project directory and run:
firebase init functions
When prompted, select JavaScript as the language option.
4. Move to the Functions Directory
After initialization, navigate to the functions folder.
cd functions
Step 4: Add the Cloud Function Code
Open the index.js file and add the following code to capture and forward the app uninstall event.
// Import required dependencies

const functions = require("firebase-functions");

const admin = require("firebase-admin");

const axios = require("axios");

// Configure your SDK key

const SDK_KEY = "";

// Initialize Firebase Admin

admin.initializeApp();

// Cloud function triggered on app removal

exports.sendAndroidUninstallToTrackierApptrove =

functions.analytics.event("app_remove").onLog((event) => {

 // Extract user properties

 const installId =

   event.user.userProperties.ct_objectId

     ? event.user.userProperties.ct_objectId.value

     : "";

 const mode =

   event.user.userProperties.ct_mode

     ? event.user.userProperties.ct_mode.value

     : "";

 const cuid =

   event.user.userProperties.ct_uid

     ? event.user.userProperties.ct_uid.value

     : "";

 const cmail =

   event.user.userProperties.ct_mail

     ? event.user.userProperties.ct_mail.value

     : "";

 // Trackier uninstall endpoint

 const url = "https://events.trackier.io/v1/uninstall";

 const payload = JSON.stringify({

   installId,

   sdkKey: SDK_KEY,

   mode,

   cuid,

   cmail,

   meta: event

 });

 // Send uninstall data to Trackier

 axios.post(url, payload, {

     headers: { "Content-Type": "application/json" }

 })

 .then((response) => {

     console.log(JSON.stringify({

         installId,

         status: response.status,

         data: response.data

     }));

 })

 .catch((error) => {

     console.error(JSON.stringify({

         installId,

         status: error.response.status,

         data: error.response.data

     }));

 });

});
This function listens for the Firebase app_remove event and sends the app uninstall data to Trackier using an HTTP request.
Step 5: Configure Package Dependencies
Next, open the package.json file inside the functions directory and configure it as shown below.
{

 "name": "functions",

 "description": "Cloud Functions for Firebase",

 "scripts": {

   "lint": "eslint .",

   "serve": "firebase emulators:start --only functions",

   "shell": "firebase functions:shell",

   "start": "npm run shell",

   "deploy": "firebase deploy --only functions",

   "logs": "firebase functions:log"

 },

 "engines": {

   "node": "18"

 },

 "main": "index.js",

 "dependencies": {

   "axios": "^0.24.0",

   "firebase-admin": "^10.0.1",

   "firebase-functions": "^3.16.0"

 },

 "devDependencies": {

   "eslint": "^8.6.0",

   "firebase-functions-test": "^0.3.3"

 },

 "private": true

}
Step 6: Configure ESLint
If an ESLint configuration file does not exist, create .eslintrc.js and add the following code.
module.exports = {

 root: true,

 env: {

   es6: true,

   node: true

 },

 extends: [

   "eslint:recommended"

 ],

 rules: {

   quotes: ["error", "double"]

 }

};
Step 7: Install Dependencies
Install all required dependencies.
npm install
Step 8: Deploy the Cloud Function
Finally, deploy the cloud function to Firebase.
npm run deploy
Once deployed, your system will start processing every app uninstall event and forwarding the data to Trackier Apptrove.
Monitoring the Cloud Function
You can monitor the status and logs of your deployed function from the Google Cloud Console:
https://console.cloud.google.com/functions/list
Monitoring helps verify whether each app uninstall request is successfully processed.
How to Find the Firebase Project ID
You may also need your Firebase Project ID while configuring services.
Follow these steps to locate it:
- Go to the Firebase Console
- Log in using your Google account
- Select your app’s Firebase project
- Click the Settings next to Project Overview
- Open Project Settings
- In the General tab, find the Project ID listed below the project name
This ID is used when working with Firebase services and managing your app uninstall tracking configuration.
Final Thoughts
Setting up app uninstall tracking may sound technical at first, but once the steps are implemented, it becomes a powerful tool for understanding user behaviour.
By connecting Firebase Analytics with Trackier Apptrove through a cloud function, you can automatically capture every app uninstall event and analyze why users leave your app. These insights help improve retention strategies, optimize campaigns, and enhance the overall user experience.
With the configuration completed, your system will continuously monitor uninstall activity and provide valuable data for smarter mobile marketing decisions.
We are delighted to have assembled a world-class team of experienced professionals who are ready to take care of your queries and answer any questions you may have. Feel free to reach out to us at any time by emailing us at support@apptrove.com or by using the in-platform chat feature. We’d love to hear from you!
from Apptrove https://apptrove.com/how-to-monitor-app-uninstalls-in-apptrove-guide/
via Apptrove

Comments
Post a Comment