How to Use the Re-Targeting Feature in Apptrove to Win Back Lapsed Users?
Acquiring a new user can cost 5-7 times as much as getting a user who has previously installed your application to return. The majority of marketing budget is generally allocated toward acquisition campaigns, however, re-targeting helps to correct this imbalance. Apptrove allows users to perform re-targeting with the same measurement precision and communication as traditional acquisition campaigns.
In this guide we will walk you through every step of using Apptrove’s re-targeting feature including how it works, how to set it up, where you can access results and how to ensure that a user who returns generates revenue beyond simply reinstalling and then un-installing again.
Before you begin, make sure your Apptrove SDK is fully integrated and your in-app events are being tracked. Re-targeting in Apptrove runs on behavioural signals, and the richer your event data, the more precisely you can identify and recover lapsed users.
How Does Re-Targeting Work in Apptrove?
Re-targeting in Apptrove is built around a straightforward idea: every user who already installed your app is a warmer prospect than any stranger seeing your ad for the first time. The feature helps you reach those existing users, either to bring them back to an app they still have installed, or to encourage a reinstall if they have already left.
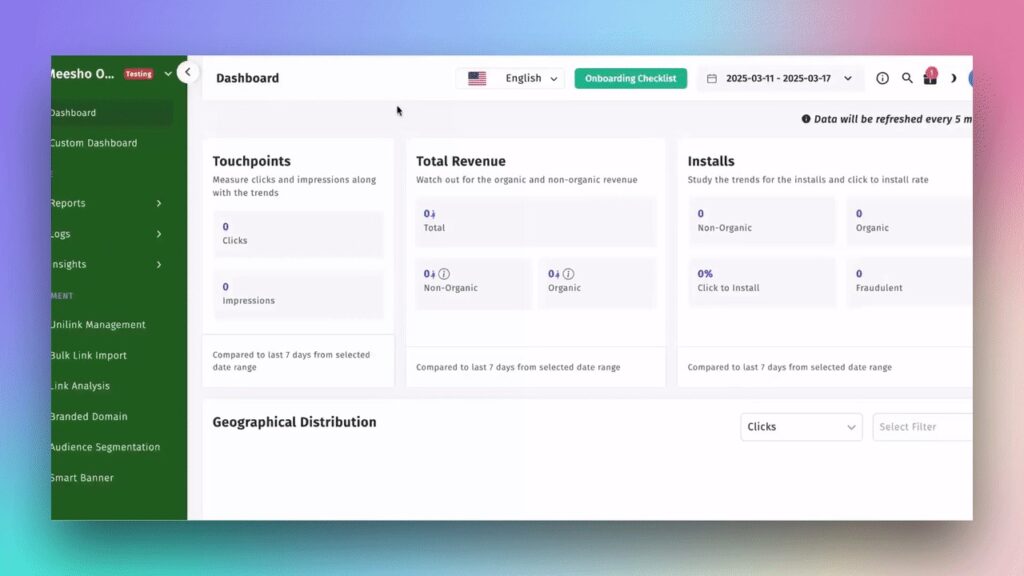
Log in to your Apptrove dashboard to get started. If you are new to the platform, here is what the main dashboard looks like when you first sign in.
The Apptrove dashboard on login. Re-targeting configuration lives under App Settings, while your results appear in the Reports and Logs sections of the navigation panel.
Re-targeting actions in Apptrove can fall under either the re-engagement category (user has the app still on device, but hasn’t been using it) or the re-attribution category (user has uninstalled the app).
For example, when a user goes back into the app after receiving a motivation (re-targeted ad, push, email, etc.), the re-engagement event is attributed to the re-targeting campaign by tracking the return session back to the campaign’s click. This method allows Apptrove to give credit for re-engagement to the appropriate media partner.
Users who have uninstalled your app entirely can also be re-attributed when they respond to a re-engagement campaign and reinstall. The re-install will be credited to the last re-targeted advertising source and will not be attributed back to the original acquisition source.
Each re-targeting attribution in Apptrove is governed by two windows: the Inclusion Window (the Re-Engagement Window) is the time frame in which the user’s return to your app is credited to the re-targeting campaign; and, the Exclusion Window (the Minimum Time Between Re-Engagement Conversions) is the period of time that blocks a second re-engagement from the same user to avoid double-counting. Both of these configuration settings can be set in your App Settings, and we will take you through the steps of configuring these windows below.
Configuring Re-Targeting in App Settings
All re-targeting configuration lives inside Application Settings under the App Settings tab. Navigate there now, everything you need to set up before launching any campaign is on this single screen.
The Re-Attribution Window and Re-Engagement Toggle
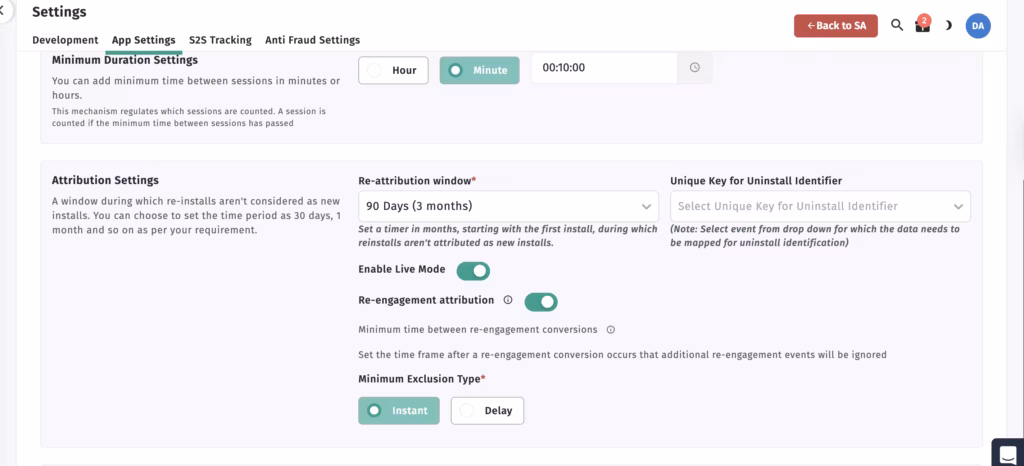
The Attribution Settings panel controls two things: how reinstalls are classified, and whether re-engagement tracking is active at all.
The Attribution Settings panel in App Settings. The Re-attribution window is set to 90 Days. The Re-engagement attribution toggle is ON, which reveals the Minimum Exclusion Type options below it.
The Re-Attribution Window refers to the period of time (30 days, 1 month or 90 days) after an app uninstall when Apptrove will consider an app that was reinstalled as a re-attribution and not a new install. Depending on how often your users utilize your app, you may set this window shorter or longer (i.e. If you have an eCommerce/gaming app, then you would set this window shorter; If you have a financial technology/subscription app, you would set the window longer). If you set your re-attribution window to 90 days and a user uninstalls on Day 1 and reinstalls on Day 60 after clicking a re-targeting ad, that reinstall will be treated as a re-attribution instead of a new install, therefore the campaign that brought the user back will receive credit for that reinstall.
Under the Re-Attribution Window is a field called the Unique Key for Uninstall Identifier. This field is used to identify uninstall events back to an in-app event as recorded in your Apptrove account. Choosing the correct in-app event for uninstall tracking will enable Apptrove to accurately identify an uninstall event, which then enables accurate re-attribution tracking on any reinstalls that occur.
The Re-Engagement Attribution toggle is the overall control for all aspects of re-engagement attribution. Until it is enabled, users who return to the app after clicking a re-targeting campaign link will be attributed as organic sessions, and your re-targeting spend will register as having zero impact even when it is performing well. Enable this before you launch any campaign.
The Exclusion Window: Minimum Time Between Re-Engagement Conversions
Once you enable the Re-Engagement Attribution toggle, the Exclusion Window settings appear below it. This is the most misunderstood part of re-targeting configuration, and getting it wrong leads to inflated re-engagement numbers that make campaigns look better than they are.
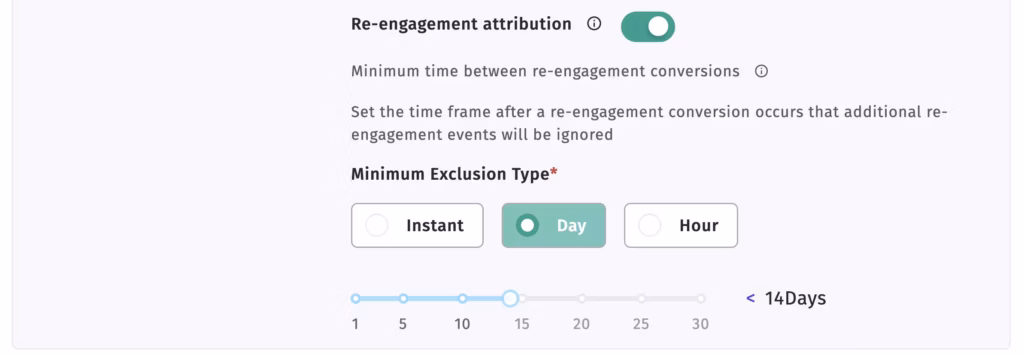
The Exclusion Window set to 14 Days. With this configuration, if the same user triggers a re-engagement on Day 1, their next countable re-engagement cannot be recorded until Day 15, regardless of how many times they open the app in between.
The Exclusion Window controls how long Apptrove waits after a re-engagement conversion before counting another one from the same user as a separate conversion. Three options are available: Instant, Hour, and Day. Instant means there is no delay at all, every app open through a re-targeting link counts immediately as a new re-engagement.
For high-frequency apps, such as News or Casual games, it makes sense to use an hourly separation (which is offered by using the Hour as an option for the Separation metric) when the app is opened and closed a significant number of times each day. However, choosing a Day and then using the slider to pick an appropriate separation duration for your app, would be the best option for most apps since using this option helps ensure that the re-engagement counting metrics do not become inflated because of multiple opens from a single user.
Note that one guideline to remember is that if you choose a shorter Re-Engagement Window comparison (than an Exclusion Window that you configure here), then the Exclusion Window will not be utilized, so you should always make sure that both of these windows are considered to be configured together, relative to how you would like them to be configured.
Setting Up the Re-Engagement Window at the Partner Level
While App Settings controls your app-wide re-targeting behaviour, the Re-Engagement Window is also configured at the individual partner level inside each partner’s integration. This is where you define exactly how long a returning user’s in-app activity will be attributed to that partner’s re-targeting campaign.
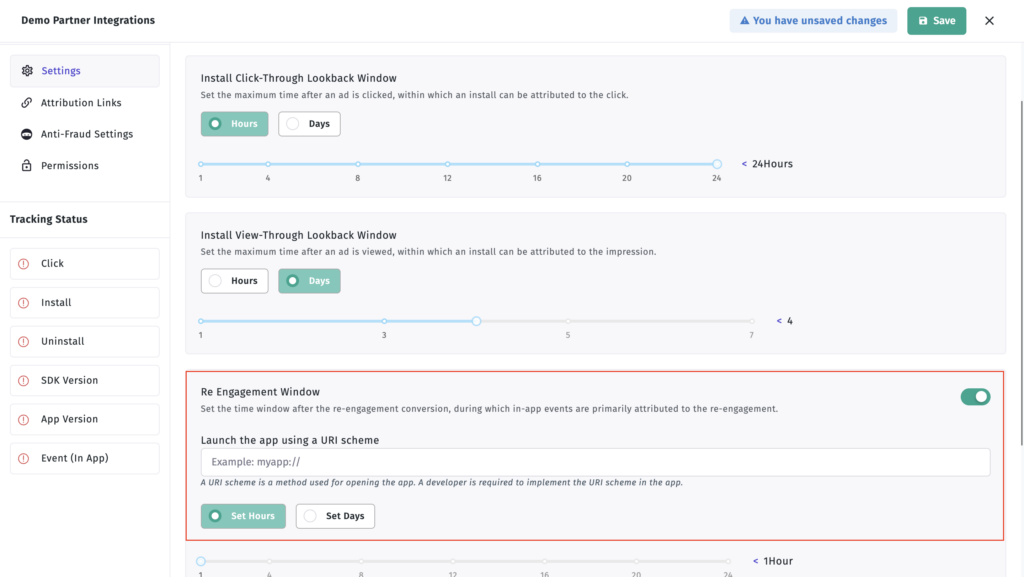
The Re Engagement Window section inside a partner’s integration settings, highlighted in red. Toggle it ON, enter your URI Scheme, and set the attribution window duration using the slider.
To configure it, go to the relevant partner integration and open Settings. Scroll down to the Re Engagement Window section, it is highlighted in the screenshot above. Flip switch to on. Put deep link URL into URI Scheme field so tapping the campaign link opens the app on that screen for the re-engaged user. A generic entry (myapp://) opens to the home screen and a more specific entry (myapp://cart or myapp://offer/summer), opens directly to the appropriate app destination, giving you better post-return conversion rates. Your developers will need to build the URI Scheme into the app code before you can use it here. Once you’ve entered it, select Set Hours or days and drag the slider to set the attribution window. Click Save when complete.
When determining an app’s window, consider the natural behaviour of your app. Examples: E-Commerce and Shopping Apps usually work well with 7 – 14 Days; Gaming Apps generally will work well with 3 – 7; Finance, Subscription & OTT Apps typically need 14 – 30 days; Utility Apps may need as long as 60 Days. Setting the Window too short means you will lose revenue generated by your campaign, setting it too long means you will include more than just the revenues generated from your campaign and receive credits that should have come from organic activity.
How Partners Access the Re-Engagement URL
Once re-engagement tracking is enabled at both the app level and the partner level, the Re-Engagement URL becomes available inside the partner’s Attribution Links panel. This is the URL your media partners, ad networks, agencies, push providers, use to route clicks through Apptrove’s attribution system.
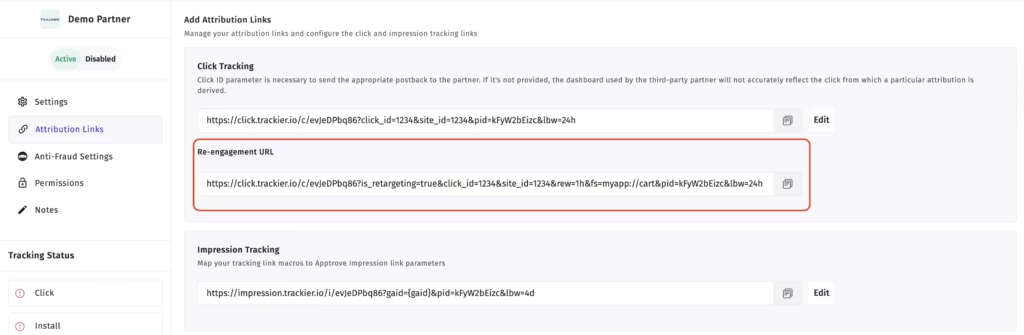
The Attribution Links section inside a partner’s integration. The Re-engagement URL, highlighted in red, sits below the standard Click Tracking URL. The URL structure confirms correct configuration, it contains is_retargeting=true, the rew (re-engagement window) parameter, and the fs (URI Scheme) parameter.
Every click on this URL is tracked. Every app open that results from a click, within the Re-Engagement Window, is attributed back to this partner. The URL is automatically built with is_retargeting=true to flag it as a re-targeting click rather than an acquisition click, rew= for the re-engagement window duration you set, and fs= for the URI Scheme deep-link destination.
Create a separate Re-Engagement URL for each channel running your campaign. One for Meta, one for Google, one for email, one for push. This is the only way to compare channel-level re-engagement performance accurately in your reports, and to move budget confidently toward whichever channel is actually bringing users back who generate revenue.
How to Read Your Re-Targeting Results
Once your campaigns are running, go to the Logs section of your Apptrove dashboard to review individual event-level results. The Logs view tells you whether each event is part of a re-targeting campaign, and when it is, it displays two partner columns side by side.
The Primary Partner column shows the re-targeting media source that drove the user’s return or reinstall. The Partner Attribution column shows the original acquisition source through which the user first installed the app. This dual-partner view is what makes Apptrove’s re-targeting data meaningful, it tells you not just that the user came back, but which campaign brought them back, and which in-app events they completed once they did.
In addition to Logs, check the Engagement section of your dashboard for overall aggregated performance of all your partners and campaign, and compare that success against your other unified performance metrics. When monitoring these performance metrics, do not look at the top level metrics only. Instead, analyse your data with respect to re-engagements as a measure of lapsed users who return back to using the app, and look for a Post-Return Event and Revenue Post-Return to determine if those returned users provide real value for your business. A user who only opened the app after clicking on a re-targeting ad is a false measure of success; they engaged with your business once, but did not provide you with significant future value. A user who returns back to the app and purchases a product, subscribes, or completes 5 sessions within the following week would be a true form of re-engagement and usage of your app. Monitor your reporting configuration to ensure you are providing yourself with a measure of re-engagement through the use of Post-Return Events or Revenue Post-Return for re-engaged users rather than only providing a measure of session count.
Another metric to consider is the Re-engagement Rate (the number of re-engaged users divided by the total clicks on a re-targeting link). A Re-engagement Rate that remains consistently low is typically an indication that your re-targeting ad creative and/or post-click landing experience do not create a desirable experience for the user who has already used your business.
Which Report View to Use and When
Apptrove gives you three different report views when analysing campaign performance, and choosing the right one matters.
Use the Retargeting view when you are evaluating re-targeting campaigns on their own terms, reporting ROI to stakeholders, comparing partner performance, or checking whether lapsed users are converting post-return. This view shows only re-engagements and re-attributions, with no acquisition installs mixed in.
Use the Unified view during monthly budget reviews when you need to see how acquisition and re-targeting performance sit side by side, and decide how to split spend between the two strategies going forward.
Use the User Acquisition view when you want to confirm that your acquisition campaigns are improving independently of your re-targeting activity, so that re-engagement numbers are not masking a decline in new-user performance.
Mixing these views without awareness of what each one includes is one of the most common reasons teams misread their data and draw the wrong conclusions about which strategy is working.
Common Issues and How to Fix Them
If re-engagements are showing up as organic sessions, the most likely cause is that the Re-Engagement Attribution toggle is still OFF in App Settings, or that the campaign link is missing the is_retargeting=true parameter. Go to App Settings, open Attribution Settings, and verify the toggle is enabled.
If a partner is not receiving re-engagement postbacks, it is almost always because the Re-Engagement and Re-Attribution events have not been enabled in the campaign’s postback settings. Go to the partner integration, open Postbacks, and toggle both events on.
If you are seeing clicks on the re-targeting link but zero re-engagements, users are likely clicking but not opening the app, or the attribution window has already expired by the time they do. Check that the click link opens the app via a Universal Link or App Link, not a mobile web page.
If your re-engagement rate looks strong but post-return revenue is low, your audience segment contains low-intent users. Tighten your targeting to users who had prior purchase history or who completed meaningful in-app milestones before going dormant. Use Apptrove’s Audience Segmentation to build that segment before your next campaign launch.
If re-attribution is being credited to the wrong campaign, you have multiple re-targeting campaigns running simultaneously with overlapping lookback windows. Give each campaign a dedicated, non-overlapping window.
Before You Go Live: Things to Check
Enable the Re-Engagement Attribution toggle before any campaign goes live. If it is not on when your first click comes in, that user’s return will be recorded as organic and the entire spend on that campaign will appear to have generated zero results.
Set the Re-Attribution Window to match how your users actually behave after uninstalling, not to what sounds reasonable in a meeting. Review it quarterly because user behaviour shifts with product updates and seasonal patterns.
Always use a URI Scheme that sends users somewhere meaningful inside the app. A re-engaged user who lands on the home screen is much less likely to convert than one who lands exactly where the campaign message promised to take them.
Create separate re-engagement URLs for each channel. There is no other way to know whether Meta or push notifications are driving better quality returns for your specific app.
Suppress your daily-active users from every re-targeting audience. Running re-targeting ads against users who are already engaged wastes budget and, more importantly, can irritate the very people you most want to keep loyal.
Pair your re-targeting data with the Cohort Report to close the loop. The Cohort Report tells you whether the users you are winning back are generating value over the following weeks, or whether they are one-session returns that look good on a dashboard but add nothing to revenue.
Final Thoughts
Re-targeting isn’t a campaign to remind people to use your app. Instead, it’s a method to measure what helps bring people back into your app. Once a person installs your application, they’ve made the hardest decision – the decision to download the app and try your product. Apptrove allows you to find out which advertising campaigns, on which channels, at which points in a user’s life, return those users to you as profitable customers.
By setting the Windows correctly so that they are sent to useful endpoints by means of the URI Scheme and separating the URL by channel, you’ll have the answers to these questions every day in your dashboard. The data will show you where to focus your efforts on recovering lapsed users, and where you shouldn’t focus your efforts on recovering lapsed users.
Want to go deeper? Read how to use the Retention Report to identify the exact drop-off points worth targeting, and the Cohort Report to measure whether the users you win back are generating value over time.
We are delighted to have assembled a world-class team of experienced professionals who are ready to take care of your queries and answer any questions you may have. Feel free to reach out to us at any time by emailing us at support@apptrove.com or by using the in-platform chat feature. We’d love to hear from you!
from Apptrove https://apptrove.com/how-to-use-re-targeting-feature-in-apptrove/
via Apptrove

Comments
Post a Comment