How to Set Up Data Locker in Apptrove and Send Raw Data to Your Cloud Storage?
Apptrove users typically log into their accounts each week and go through the same routine of navigating to Reports, adjusting the date range and applying filters, clicking Export, and then going through this same process again the following week. If your team is using BI tools, such as Looker, Tableau, or Metabase, this is a problem because there is a significant amount of time between when your data is actually created and when your team can take action on the data.
The solution to this problem is to use Data Locker.
With Data Locker, you do not have to manually export your Apptrove reports. Instead, you can automatically stream your raw data (install, events, clicks, impressions) directly into your own bucket on the cloud from Apptrove. Your BI, warehouse, and internal pipelines can then access the data automatically and without any manual intervention.
This guide will cover everything you need to know about using Data Locker, when to use it, and how to connect to GCS, AWS S3, or Microsoft Azure step-by-step.
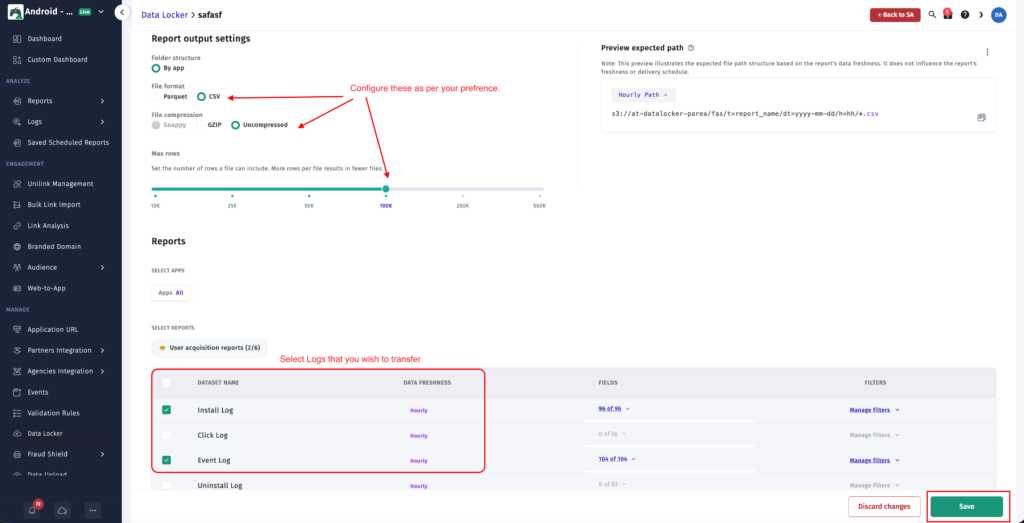
What Is Data Locker in Apptrove & How it Works?
Apptrove provides a Data Locker function. With this, you can stream the contents of your own attribution data stored in the cloud to a destination you control and own.
- Data Locker provides your raw data (install logs, application event data, click records, impression records) exported from your data source automatically and continuously.
- The output files are organized in a manner that allows you to quickly query them when saved in your cloud bucket (AWS S3, GCS or Azure Blob Storage).
- Your analytics team will connect from their BI tools or data warehouse directly to this bucket, so they do not have to go through the manual download process.
This configuration is ideal for Apptrove users whose teams rely on making regular decisions based on attribution data and do not want the lag time associated with manual exports.
Step-by-Step Setup
Option 1: Google Cloud Storage (GCS)
Step 1 — Create a Bucket
- Go to Google Cloud Console and open the Storage section.
- Click Create Bucket.
- Enter a bucket name that begins with at-datalocker- (for example, at-datalocker-myapp).
- Complete the remaining settings and click Create.
Step 2 — Grant Apptrove Access
- Open your newly created bucket.
- Go to the Permissions tab.
- Click Add Members (or Grant Access depending on your console version).
- In the New Members field, add the following Apptrove service account:
apptrove-datalocker@trackier-mmp.iam.gserviceaccount.com
- Assign the role Storage Object Admin.
- Click Save.
This gives Apptrove the ability to write and manage files inside your bucket.
Step 3 — Connect in Apptrove
- In your Apptrove dashboard, navigate to Data Locker.
- Click New Connection.
- Select Google Cloud Storage from the provider list.
- Enter your bucket name.
- Click Test Connection to verify the permission setup is correct.
- Click Save to activate the connection.
Data will begin appearing in your bucket shortly after the connection is confirmed.

Option 2: Amazon S3 (AWS)
Step 1 — Create a Bucket
- Log in to your AWS Console and navigate to S3.
- Click Create Bucket.
- Enter a bucket name starting with at-datalocker- (for example, at-datalocker-myapp).
- Choose your preferred region.
- Click Create Bucket.
Step 2 — Add a Bucket Policy
- Open your bucket and go to Permissions.
- Click Bucket Policy, then click Edit.
- Paste the following policy, replacing at-datalocker-my-bucket with your actual bucket name in both Resource lines:
{
“Version”: “2012-10-17”,
“Statement”: [
{
“Sid”: “Apptrove_DataLocker_Access”,
“Effect”: “Allow”,
“Principal”: {
“AWS”: “arn:aws:iam::429528098617:user/apptrove-datalocker-prod”
},
“Action”: [
“s3:GetObject”,
“s3:ListBucket”,
“s3:DeleteObject”,
“s3:PutObject”
],
“Resource”: [
“arn:aws:s3:::at-datalocker-my-bucket”,
“arn:aws:s3:::at-datalocker-my-bucket/*”
]
}
]
}
- Click Save Changes.
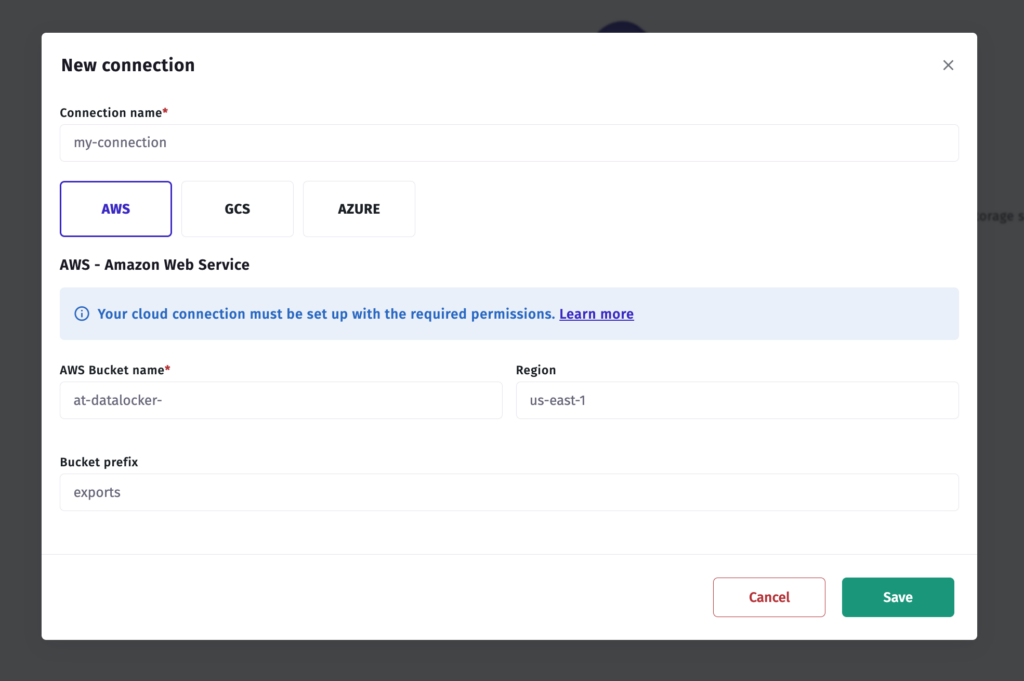
Step 3 — Connect in Apptrove
- In your Apptrove dashboard, navigate to Data Locker.
- Click New Connection.
- Select AWS from the provider list.
- Enter your bucket name.
- Click Test Connection.
- Click Save to activate the connection.
Option 3: Microsoft Azure
Step 1 — Create a Storage Account
- Log in to the Azure Portal and navigate to Storage Accounts.
- Click Create.
- Fill in the required details for your subscription, resource group, and region.
- Under Advanced, enable Hierarchical namespace (this is required for Data Locker compatibility).
- Complete the setup and click Review + Create.
Step 2 — Create a Blob Container
- Open your new storage account and go to Storage Browser.
- Select Blob Containers.
- Click Add Container and give it a name.
- Click Create.
Step 3 — Retrieve Your Access Key
- In your storage account, go to Access Keys (under Security + Networking).
- Copy the following values:
- Storage account name
- Access key (either key1 or key2)
Keep these ready — you will need them in the next step.
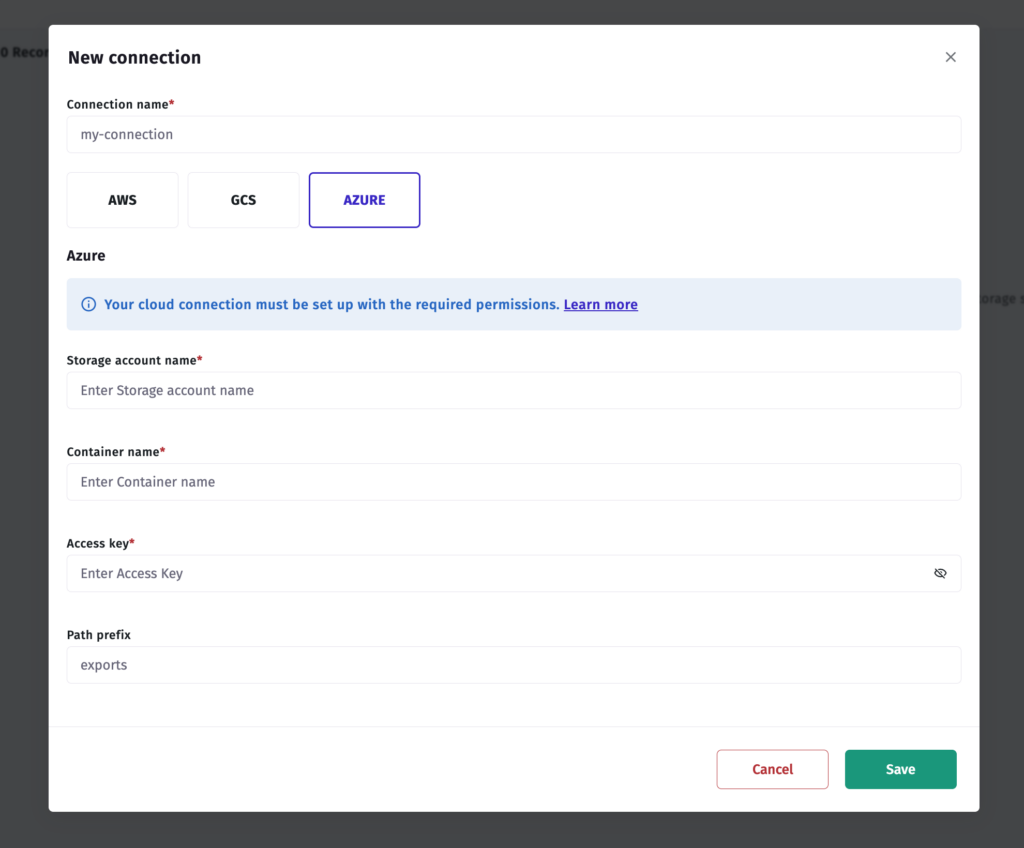
Step 4 — Connect in Apptrove
- In your Apptrove dashboard, navigate to Data Locker.
- Click New Connection.
- Select Azure Blob Storage from the provider list.
- Enter:
- Container name
- Storage account name
- Access key
- Click Test Connection.
- Click Save to activate.
What Happens After the Connection Is Active?
Once your Data Locker connection is saved and verified, Apptrove begins writing raw data files to your cloud bucket automatically. The data is organised in a structured format that is straightforward to query from standard analytics tools and data warehouses.
From here, your next steps depend on your team’s setup:
- Data warehouse users (BigQuery, Redshift, Snowflake) can create external tables or load jobs that ingest directly from the bucket.
- BI tool users can connect their tool to the cloud storage bucket or to the warehouse tables built on top of it.
- Engineering teams can build automated pipelines that trigger on new file arrivals to run transformations, generate alerts, or populate downstream systems.
For the full technical schema and file structure that Apptrove uses in Data Locker exports, refer to the Apptrove Developer Documentation.
Who Should Use Data Locker?
Data Locker is especially valuable if any of the following describes your team:
- You have a data analyst or BI engineer who builds dashboards in Looker, Metabase, Tableau, or similar tools.
- You want to join Apptrove attribution data with other first-party data (CRM records, product events, revenue data) inside a data warehouse.
- You run campaigns at a scale where downloading and uploading CSVs manually is creating bottlenecks.
- You are building automated reporting pipelines or alert systems that need fresh attribution data on a regular schedule.
If your primary use case is checking top-line numbers in the Apptrove dashboard itself, the standard Reports and Custom Dashboard features are sufficient. Data Locker is for teams that need raw data flowing downstream.
Supported Cloud Platforms
Data Locker supports three cloud providers:
- Google Cloud Storage (GCS)
- Amazon S3 (AWS)
- Microsoft Azure Blob Storage
The setup process is slightly different for each, but the outcome is the same: Apptrove is granted write access to a dedicated bucket you create, and data starts flowing automatically once the connection is saved.
Important: The cloud setup steps (creating buckets, assigning permissions, and generating access keys) must be performed by your cloud administrator. If you are not the person who manages your organisation’s AWS, GCP, or Azure environment, share the relevant section below with that person before proceeding.
Troubleshooting
Test Connection is failing for GCS: The most common cause is that the service account was not added with the Storage Object Admin role, or the bucket name was entered with a typo. Double-check both, then re-test.
Test Connection is failing for AWS: Verify that the bucket policy was saved correctly and that both Resource ARN lines include your exact bucket name. A common mistake is leaving at-datalocker-my-bucket as the placeholder in one of the two lines.
Test Connection is failing for Azure: Confirm that Hierarchical namespace was enabled when the storage account was created. Also verify that you copied the access key (not the connection string) into Apptrove.
Data is not appearing in the bucket after a successful connection: Allow some time for the first export cycle to complete. If files have not appeared after a few hours, contact Apptrove support via in-platform chat or at support@apptrove.com.
Quick Reference Summary
| Step | GCS | AWS S3 | Azure |
| Create destination | Storage bucket | S3 bucket | Storage account + blob container |
| Name requirement | Must start with at-datalocker- | Must start with at-datalocker- | No naming restriction on container |
| Permission method | Add the Apptrove service account with the Storage Object Admin role | Add Apptrove bucket policy with specific IAM ARN | Provide storage account name and access key |
| Provider in Apptrove | Google Cloud Storage | AWS | Azure Blob Storage |
Need Help?
If you run into any issues during setup, the Apptrove support team is available around the clock. Reach them via the in-platform chat feature or by emailing support@apptrove.com.
For the complete technical reference on Data Locker file formats and schemas, visit the Apptrove Developer Hub.
from Apptrove https://apptrove.com/how-to-set-up-data-locker-in-apptrove/
via Apptrove

Comments
Post a Comment