How to Upload Audience Segments to Google Ads Using Apptrove
Most Google Ads campaigns target everyone who might be interested. Audience-based campaigns target people who already showed up, users who viewed your ad but didn’t install, users who installed but never converted, or users in high-revenue regions you want to double down on. Apptrove’s Audience Segmentation feature lets you define these groups with precision inside your MMP, and then push them directly to Google Ads so your campaigns reach exactly the users you’ve identified.
This guide walks you through the complete process: How to upload audience segments to Google Ads via API for automatic sync, and uploading it manually via CSV when you need a one-off push. Every step below maps to a screenshot from the actual dashboard so there is no guesswork about what to click.
What Is Audience Segmentation in Apptrove?
Apptrove’s Audience Segmentation lets you create custom user groups based on combinations of in-app behaviour, demographics, device attributes, geography, revenue data, attribution type, and media source. Each group is called a segment. Once a segment’s status turns Active, its list of user device IDs can be exported or synced to an ad partner.
Apptrove supports two user identifier types for audience segments:
- Device ID (GAID): Compliance is assessed per device. When a device ID meets the ruleset conditions, it’s added to the audience list.
- CUID (Customer User ID): Compliance is assessed by grouping all device IDs associated with the same CUID. If the group qualifies, all device IDs in that group are added.
You can also select which parameters to export: customer ID, name, phone number, or email, using the Export only Selected Params field during segment creation.
Part 1: Building an Audience Segment in Apptrove
Before you can upload audience segments to Google Ads, you need a segment. This section covers both the manual custom creation and the faster Suggested Segment route.
Step 1, Navigate to Audience Segmentation
Log in to your Apptrove dashboard. In the left navigation panel, go to Engagement → Audience → Segmentation.
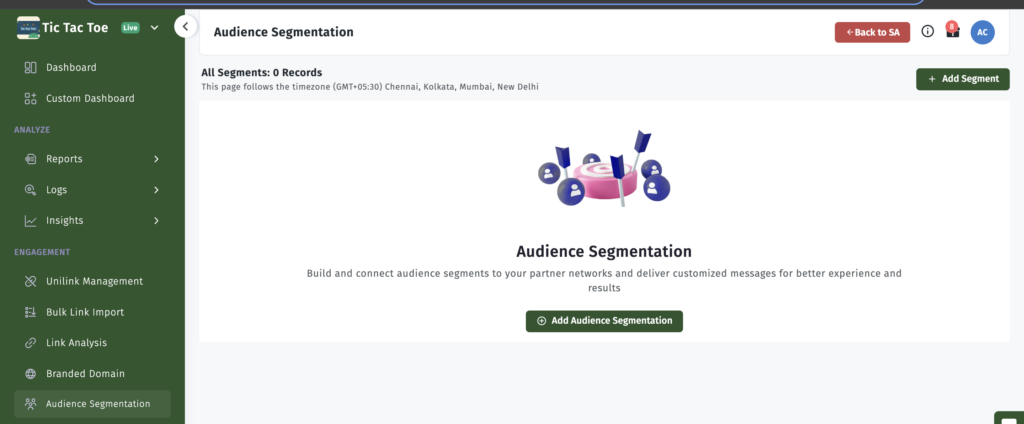
If this is your first segment, you’ll land on an empty state screen. Click Add Audience Segmentation to begin.
The Audience Segmentation screen on a fresh account. Click “Add Audience Segmentation” to create your first segment.
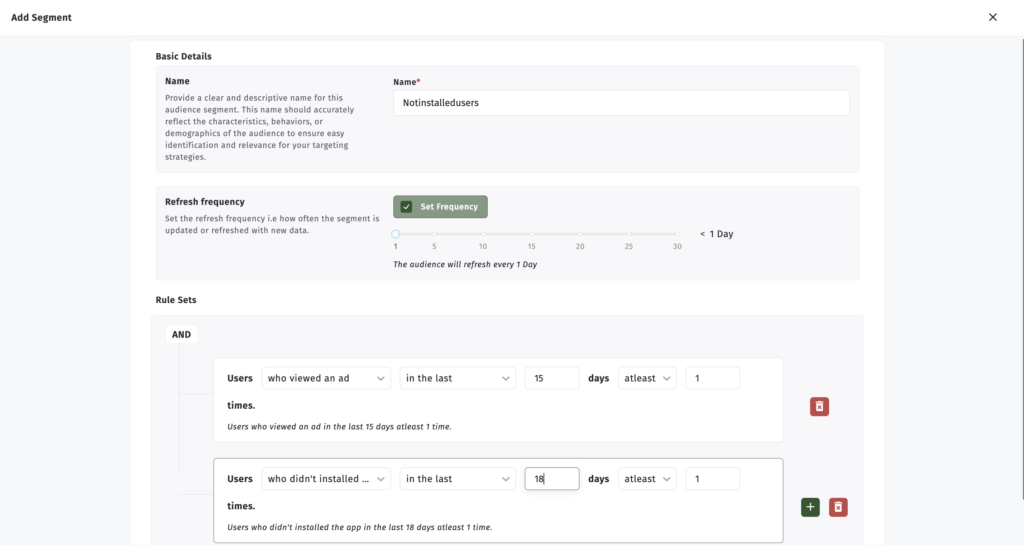
Step 2, Fill in Basic Details and Set Refresh Frequency
The Add Segment panel opens as a full-page form. Fill in:
- Name: Give it a descriptive name that reflects the audience criteria, e.g., “NotInstalledUsers” or “HighRevenueIndia”. This name will also appear in Google Ads Audience Manager after the sync, so make it recognisable.
- Export only Selected Params: Choose which data fields to export, if relevant.
- Refresh Frequency: Use the slider to set how often the segment updates with new data. The range is 1 to 30 days. Daily refresh is recommended for always-on re-engagement campaigns. If you don’t configure this, the segment will run once and not auto-refresh.
The Add Segment form. Name your segment clearly, set the refresh frequency, and define your rulesets below.
Step 3, Define Your Rulesets
The Rule Sets section is where the targeting logic lives. Each rule filters your user base on a single condition. Multiple rules combined with AND logic create a precise, layered segment.
Apptrove supports the following rule types:
- Users who performed (or didn’t perform) a specific in-app event
- Users who viewed an ad within a time frame, at least X times
- Users who installed the app within a time frame, at least X times
- Users whose total revenue hits a threshold
- Users whose device model, OS version, app version, or carrier is (or isn’t) in a particular list
- Users with a specific location, region, country, or city
- Users where retargeting or organic attribution is enabled/disabled
- Users who clicked an ad within a time frame, at least X times
- Users whose media source is a specific partner
Below are three example rulesets to illustrate what these combinations look like in the dashboard.
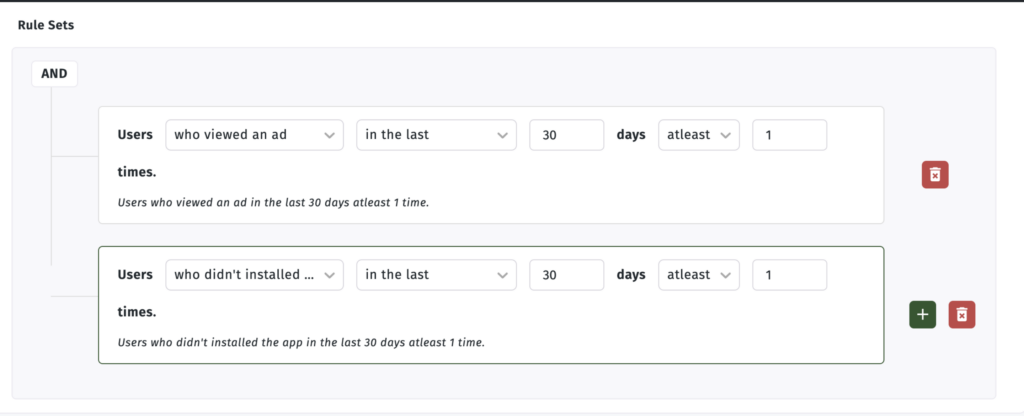
Example 1, Users who viewed an ad but didn’t install:
A two-rule AND segment targeting users who saw your ad at least once in the past 30 days but never installed. A classic top-of-funnel recovery audience.
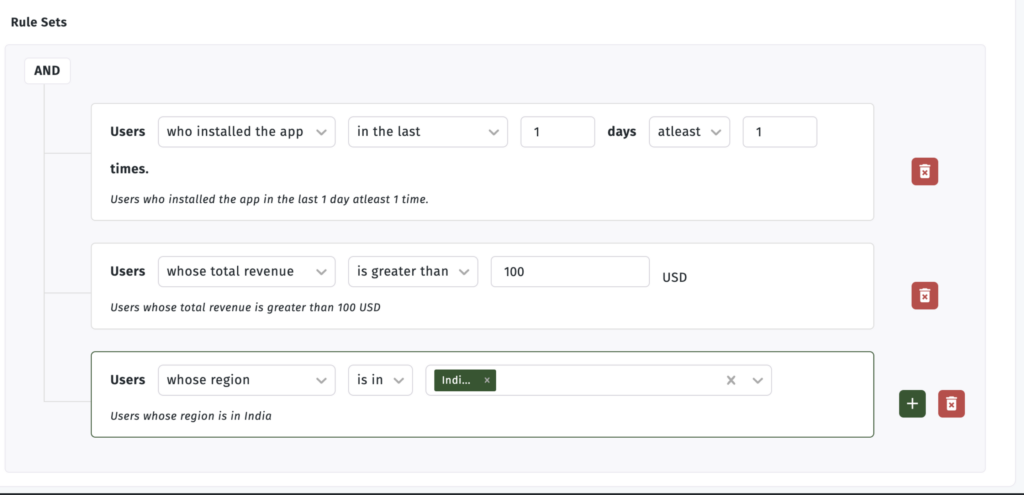
Example 2, High-revenue users in a specific region:
Three rules combined: recent installs, total revenue above $100, and region set to India. Use this to double down on your most valuable geographic segment.
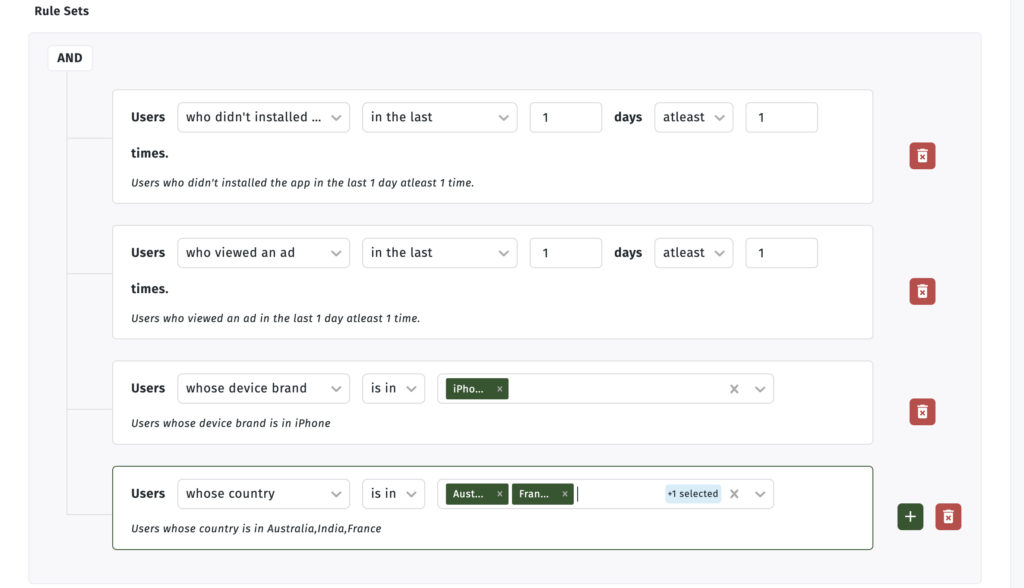
Example 3, Non-installers on iPhone in specific countries:
A four-rule segment combining install status, ad view, device brand, and multi-country targeting. This level of precision is where audience-based campaigns earn their efficiency.
Click the + (green) button to add more rules. Click the red delete icon to remove a rule. Once your rules are set, click Save or Next to proceed.
Part 2: Using Suggested Segments (Faster Route)
If you don’t want to build rules from scratch, Apptrove offers pre-built segment templates. This is the fastest way to create a segment for a standard use case.
Step 1, Click “+ Create Suggested Segment”
From the Audience Segmentation list screen, click + Create Suggested Segment (highlighted in the top button row).
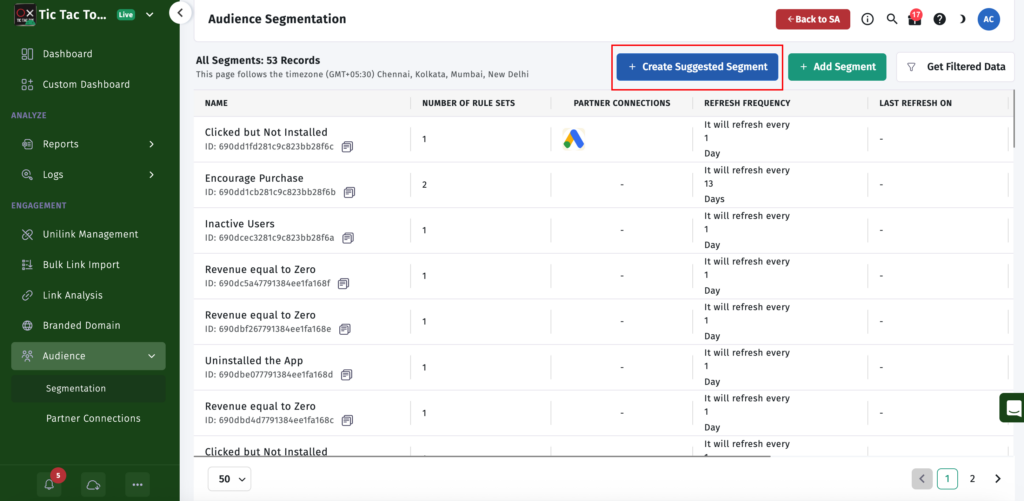
The Audience Segmentation list view. “+ Create Suggested Segment” gives you access to nine pre-built templates.
Step 2, Choose a Template
A modal opens with nine template options:
- Inactive users
- Encourage purchase
- Conversion A happened, but B did not
- Uninstalled the app
- Clicked but not installed
- Target a specific region
- Viewed but not installed
- Revenue less than expected
- Revenue equals to Zero
Select the one that matches your campaign goal.
The nine available segment templates. Each one pre-fills the ruleset, you only need to adjust the name and optionally edit event names.
Template Example 1, Clicked but Not Installed
Selecting this template pre-fills the segment with two rules: users who clicked an ad in the last 7 days and users who didn’t install the app in the last 7 days.
The “Clicked but Not Installed” template pre-configured. Two rules, daily refresh. You can adjust the lookback window if needed.
Template Example 2, Inactive Users
The Inactive Users template uses a single rule: users who didn’t trigger the AppOpen event in the last 7 days. This catches users who still have your app installed but have gone quiet.
The Inactive Users template uses the AppOpen event as the inactivity signal. Adjust the 7-day window to fit your app’s natural engagement cycle.
Template Example 3, Conversion A Happened, But B Did Not
This template creates a funnel-gap segment, users who completed one event (e.g., Registration) but haven’t completed the next (e.g., Subscribe). The default events are Registration and Subscribe, but you can edit both to match your actual in-app event names.
The Conversion A/B template. Edit the event names in both rules to match your funnel. Registered-but-not-subscribed is a high-intent re-engagement audience for most subscription apps.
Step 3, Add Connections and Save
After choosing a template and reviewing the rules, the form moves to the Add Connections step. Here you assign the segment to one or more partner connections, including your Google Ads account, before saving.
Select an existing connection or add a new one. Set the connection status to Active and confirm GAID is checked as the identifier type. Then click Save.
Assign the segment to your Google Ads partner connection at creation time. Once saved, the audience begins syncing automatically.
Part 3: Upload Audience Segments to Google Ads via API (Recommended)
The API method creates a live connection between Apptrove and Google Ads. Each time your segment refreshes on its configured schedule, Google Ads automatically receives the updated list. No manual intervention, no repeat exports.
Step 1, Go to Partner Connections
In your Apptrove dashboard, navigate to Engagement → Audience → Partner Connections. This is the central page for all partner connections across your segments.
Click + Add Connection in the top right corner.
The Partner Connections page. All your active ad partner links live here. Click “+ Add Connection” to create a new one for Google Ads.
Step 2, Configure the Connection
In the Add Connection dialog:
- Enter a Name for this connection (e.g., “Reengagement”)
- Under Select Partner, choose Google Ads (Adwords) from the dropdown
- Click + Add
Select Google Ads (Adwords) from the partner dropdown. The connection name will help you identify which audience it belongs to.
Step 3, Find Your Audience in Google Ads Audience Manager
Once the connection is saved in Apptrove, your audience automatically appears in Google Ads. Go to your Google Ads account → Tools → Shared Library → Audience Manager.
Navigate to Tools → Shared Library → Audience Manager in Google Ads to find your synced Apptrove audience.
Step 4, Select the Audience and Add to Campaigns
In Audience Manager, go to Your data segments tab. You’ll see your Apptrove audience listed, labelled “Apptrove Audience List” with the source “List from Apptrove.”
Check the box next to it, then click Add to… → Campaigns from the action bar that appears at the top.
Select your Apptrove audience and use the “Add to…” menu to assign it to campaigns or ad groups.
Step 5, Select the Campaigns
A modal opens listing all your available campaigns. Check the ones you want this audience applied to, then click Next.
Select all campaigns where this audience should be applied. You can assign a single segment to multiple campaigns simultaneously.
Step 6, Choose a Targeting Setting
On the next screen, choose how this audience should influence the selected campaigns:
- Smart default (recommended): Google Ads decides automatically
- Targeting: Ads show only to users in this audience
- Observation: Ads show broadly, but this audience is tracked separately for bid adjustment and reporting
For direct re-engagement campaigns, choose Targeting. For always-on campaigns where you want audience insights without narrowing reach, choose Observation.
Choose your targeting setting carefully. “Targeting” restricts delivery to this audience. “Observation” keeps reach open but tracks performance per segment.
Step 7, Confirm the Audience is In Use
After saving, return to Audience Manager → Your data segments. Your Apptrove audience will now appear in the In-use section at the top of the list.
Once applied to campaigns, the segment moves to the “In-use” section. It will stay synced on Apptrove’s refresh schedule.
Step 8, View Segment Details and Campaign Performance
Click on the audience name to open its detail view. Here you can see:
- Audience size across Search, YouTube, Display, and Gmail
- A growth chart showing list size over time
- Segment use table listing all campaigns and ad groups targeting or excluding this segment
- Campaign type and eligibility status
The audience detail view shows reach across placements and which campaigns are using the segment. Use the three-dot menu next to Segment use to add or remove campaigns.
Part 4: Upload Audience Segments to Google Ads Manually via CSV
If you want to upload a segment one time, for a burst campaign, a test, or a review-gated workflow, use the CSV method.
Step 1, Download the Audience CSV from Apptrove
In the Audience Segmentation list, find the segment with Active or Completed status. Click the download icon in the Actions column.
Download the audience CSV from the Actions column. Only segments with “Active” or “Completed” status have data ready for export.
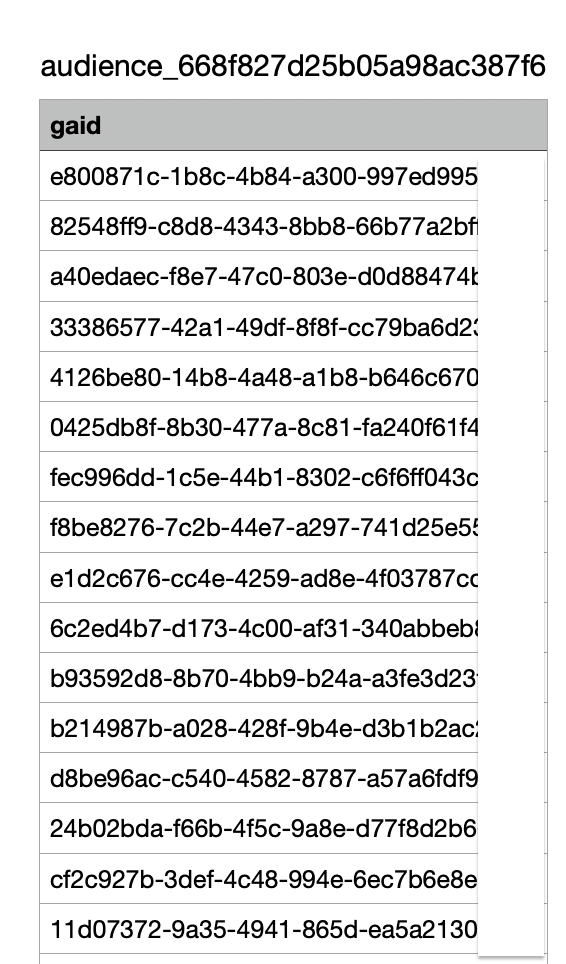
The downloaded CSV contains a single column, gaid, with one Google Advertising ID per row.
The exported CSV contains GAIDs, the mobile advertiser IDs Google Ads uses to match users to your Customer Match list.
Step 2, Open Audience Manager in Google Ads
In Google Ads, go to Tools → Shared Library → Audience Manager.
Navigate to Tools → Shared Library → Audience Manager to begin the manual upload.
Step 3, Create a New Customer List Segment
In Audience Manager, click the blue + button (Create). A dropdown appears with options: Website visitors, App users, YouTube users, Customer list, Google Analytics, Lead form segment. Select Customer list.
Select “Customer list” to begin creating a segment from your Apptrove GAID export.
Step 4, Select “Upload a File Manually”
On the data source screen, choose Upload a file manually and click Next.
Choose “Upload a file manually”, this is the path for your Apptrove GAID CSV.
Step 5, Configure Segment Details and Upload the CSV
Fill in the following:
- Segment name: Use a clear, descriptive name matching what you built in Apptrove
- Customer type: Optional, leave blank or assign a type
- Data type: Select Upload User IDs
- Data to upload: Click the upload area and select the CSV you downloaded from Apptrove
- Click Save and continue
Name the segment, select “Upload User IDs” as data type, then upload your Apptrove CSV. The filename confirms the file is ready for import.
Step 6, Apply the Audience to a Campaign
When creating a new campaign in Google Ads, you’ll reach an Audience segments section in the campaign builder. Search for the segment name you just created and select it.
In the campaign builder’s Audience segments section, search for your Apptrove-sourced segment by name and select it to apply to this campaign.
Part 5: Upload Audience Segments to Facebook Ads (Bonus)
Apptrove’s audience export works with Facebook Ads as well, following the same two-path logic: API sync via Partner Connection, or manual CSV upload.
Manual Upload to Facebook Ads
Step 1, Open Audiences in Facebook Ads Manager
Go to your Meta Ads Manager, click the people icon (Audiences) in the left sidebar. Click Create Audience → Custom Audience.
In Meta Ads Manager, go to Audiences and select Custom Audience to begin.
Step 2, Choose Customer List as the Source
In the “Choose a custom audience source” modal, select Customer list and click Next.
Select “Customer list”, this is the upload path for GAID-based data from Apptrove.
Step 3, Upload the CSV and Name Your Audience
In the Add customer list panel:
- Choose Upload a list and select your Apptrove CSV
- Under “Does your list include a column for customer value?”, select No, continue with a customer list that doesn’t include customer value
- Enter a descriptive audience name
- Click Next
Upload the Apptrove CSV, confirm no customer value column is included, and give the audience a recognisable name.
Step 4, Map Identifiers
Meta automatically detects the column from your CSV and maps it to Mobile advertiser ID. Review the mapping on the Map identifiers screen, then click Import and create.
Meta automatically maps the “gaid” column to Mobile advertiser ID. Verify it’s correct, then click Import and create.
Direct Upload to Facebook Ads via Apptrove API
For automated sync, add a Facebook Ads Partner Connection directly in Apptrove, the same way you added Google Ads. Once the connection is active, Apptrove pushes audience data to Facebook on every segment refresh.
You can verify the upload was successful by checking the Segment Logs inside Apptrove. Go to Audience Segmentation → [Your Segment] → Logs to see the upload history, record count, and status.
The Segment Logs view confirms the upload status, record count, and partner connection. “Uploaded” means the data reached Facebook successfully.
Viewing the Audience in Meta Ads Manager
Once uploaded, your Apptrove audience appears in Meta’s Audience section with Populating or Ready status. Click the audience name to view its history, including when it was created and when rows were last added.
Your Apptrove audience in Meta Ads Manager. “Populating” means it’s actively being processed. The History tab shows every update cycle.
Key Things to Know Before You Go Live
Segment status must be Active or Completed. A segment still in “In Progress” hasn’t finished processing. Wait for the status to update before trying to download or sync it.
GAID is the matching identifier. The CSV Apptrove exports uses Google Advertising IDs. Google Ads and Facebook both match these to users in their systems. Segments will only populate users whose device IDs are recognised on the ad platform, a segment of 10,000 GAIDs may result in a smaller matched audience depending on match rates.
Minimum audience size requirements apply. Google Ads requires at least 1,000 matched users for Search campaigns before a Customer Match list becomes eligible to serve. If your segment is showing “Too small to serve,” the underlying list may need more matching users.
Refresh frequency drives API sync timing. If you set a 3-day refresh on your segment, Google Ads will receive updated data every 3 days. For fast-moving campaigns, set the frequency to 1 day.
Edit or delete segments from Apptrove. Changes to your segment rules take effect on the next refresh cycle. The updated list is then pushed to Google Ads automatically on that schedule.
Wrapping Up
When you upload audience segments to Google Ads from Apptrove, it closes the loop between your MMP data and your campaign targeting. Instead of building audiences based on Google’s signals alone, you bring your own attribution-verified data, who actually saw your ad, who installed, who dropped off, who generated revenue, and put that directly into your campaign settings.
The API connection handles the ongoing sync automatically, so once it’s set up, your campaigns always target your most current segment. The CSV route is there when you want full manual control or need a one-off upload for a specific campaign window.
For teams running performance marketing campaigns or building re-engagement strategies, precise audience targeting is one of the clearest paths to reducing wasted spend. The segments you define in Apptrove are only as powerful as the campaigns you attach them to.
Have questions? Reach out at support@apptrove.com or use the in-platform chat from your Apptrove dashboard.
from Apptrove https://apptrove.com/how-to-upload-audience-segments-to-google-ads/
via Apptrove


Comments
Post a Comment